Wednesday, December 28, 2011

Triple-Chocolate Flourless Brownie Recipe


I know, Christmas is over... But this brownie recipe is one that just has to be shared.  I found this on Martha Stewarts Show at:

http://www.marthastewart.com/868369/triple-chocolate-flourless-brownies

I don't usually care for brownies but these are awesome!!!  

For this treat I simply changed the white drizzle into a green chocolate layer and then cut them into tree shapes.  Next, I melted a few colors of chocolate to add ornaments and a star.  

Getting Personal - Part 5

This website is not to the surgeon I used


Introduction:  http://itsfun4me.blogspot.com/2011/09/getting-personal-introduction.html


_____________________________________
The day before the procedure...

Well, tomorrow is the big day. I am excited to get it over with but also a little concerned about the chance that something could go wrong. I always try to stay positive but I know that I will probably shed a few tears as I am being rolled into the operating room and preparing to be put under anesthesia. At that point, and probably only at that point, I will question if the procedure is worth the slim chance that I may never wake up.

With that said, starting at midnight tonight I have to stop any eating and drinking. I have to be checked in at the hospital 2 hours before my schedule surgery. At that time they will do a few things to prep me for the procedure. The surgery should take about 1.5 hours. But, the rest of the time will determine how long it takes me to wake up. Some people wake up quickly and for some it takes up to 4 hours (from what I have heard).

It's an outpatient procedure so I should be going home shortly after that. However, I am not sure what else they might need me to complete before I can actually leave. I will keep you posted as soon as I am feeling up to typing again.


Saturday, December 24, 2011

Sweet & Salty Christmas Treat

This is a favorite that I shared in the past Sweet & Salty Treat but with a Christmas twist!


This time I used Christmas colored M&M's and I added some red, green, white sprinkles.  I have requests for this often and it is really easy to make!


And here are some pictures of other holidays I have made these for:

Valentine's with heart shaped sprinkles

Easter with pink colored chocolate


There are so many food allergies to be aware of so I started adding labels to the candy.
I also do a candy corn version (substitute for M&M's) at Halloween.

I add the twist tie along with the ribbon.  That way they can easily close the bag after testing the treats.


Use these bags and a tin for an easy and tasty present.


Ham & Cheese Tortilla Rolls

This is another favorite but this time I added a holiday twist. Of course, I make it other times of the year too.


Ingredients:

3 (8 ounces) packages cream cheese
1/2 bunch of green onion, chopped
1 package thin sliced ham (or turkey), chopped
1 (8 ounce) package shredded cheddar cheese
8 flour tortillas (any color or flavor)

Directions:

Unwrap cream cheese and place in a medium size microwaveable bowl. Warm cream cheese in microwave for about 40 seconds (to soften). Add onion, ham, and cheddar cheese and mix well with cream cheese.

It doesn't look pretty but it tastes great!

Place each tortilla on a piece of wax paper. You do not have to use wax paper but the technique that I am going to share with you is one that I recommend after years of making these.

Evenly portion out the cream cheese mixture onto the tortillas.


Spread the cream cheese mixture so it covers the entire tortilla.


Roll the tortilla into a tube shape.


Then roll the wax paper around the tortilla. This will help hold the shape along with keeping it fresh and soft. Refrigerate for at least 1 hour.


Remove wax paper and cut tortillas into small sections.


My family generally snacks on the ends since they don't often turn out "pretty" enough to share at a party. Once they are all cut they are ready to plate and serve. Keep covered and refrigerated if you are not serving them immediately.


These were for a Christmas party so I used a green spinach vegetable tortilla, stacked the rolls in a "tree" shape, added a few grape tomatoes for ornaments, and topped it with a slice of star fruit.

Thursday, December 22, 2011

Christmas Sleigh Candy Decoration


I created this after combining a few ideas I found for some cute kid friendly table decorations (place settings).  

You will need:

Plastic cups (I used the square bottom red cups by Solo)
Decorative ribbon
Candy canes (two per sled)
Cookies or candy
Tissue paper

I started with these cups:


I needed to create a sleigh look so I drew lines on a cup and cut into it until I felt like I had something that resembled a sleigh.  Honestly, this was the hardest part for me so I made sure I had extra cups!


After I had one sleigh cut the rest was pretty easy.  Using the first cup as a "template" I placed another cup inside of it and traced the cut lines.  From there I was able to make identical sleighs.


Next, I glued on trim which covered the rough edges of the cup.  For this you just need decorative ribbon.  I used a mini glue gun and simply placed small beads of glue in areas on the edge of the cup where I felt it was important to hold the ribbon in place.


Then I glued on two candy canes for the sleigh blades.  Again, I used a hot glue gun but very sparingly to avoid destroying the candy.  I placed a very thin line of glue on the bottom edges of the cup and then quickly placed the candy canes.  It dries fast!

I added a little tissue paper in the bottom of each sleigh/cup and then positioned the cookies I made.  I have seen similar sleighs with pre-made candies too.


My kids are really excited about bringing these to our holiday dinner!

Quick & Easy Christmas Fun

I am always looking for new, fun and easy crafts for my little ones.  Here are some Christmas ideas that I have come across lately that I want to share with you.

My daughter had a "Grinch" party in her kindergarten class this year.  The kids were able to wear their pajamas and they each brought a stuffed animal to school.  As part of the party, they watched the cartoon version of the grinch.  Then they made paper head bands with one paper antler like Max from the show.  The picture below is what the teacher sent home with each of the kids.  It's attached to a green candy cane.


This candy cane is adorable and really simple to make.  You just need red & white beads, red pipe cleaner and string to hang it (we used yarn).  Cut the pipe cleaners in half (for smaller candy canes).  Have the kids add the beads.  Wrap the pipe cleaner around the first and last beads to secure them.  Bend it in the shape of a candy cane and then add string to hang it.  This is a cute ornament that will last for years!


Magic Reindeer Food:  I have seen a few ways of doing this and a variety of cute packaging.  This is what we had this year.  You just add some oatmeal and some Christmas color sprinkles (easy for kids to do on their own).  Place it in some kind of packaging with a note explaining what to do with the food.  My kids LOVE doing this every year.  It's a special treat for the reindeer that have been working so hard!


I would love to hear about any quick and easy kids crafts you have done!

Monday, December 19, 2011

Tips I've Learned: Juicing a Lime/Lemon

Of course I had to get one of these!


It's the best "juicing" tool I have found yet!  Here's the thing - I always thought the best way to use this tool was to face the lime/lemon this way:


But, while in a cooking class, I was told that the correct way is this:


I have tried both and I have to agree that it is less messy and more effective when the fruit is pressed inside out!

Tips I've Learned: Cutting an Avocado

There are many tips I have learned from watching cooking shows or taking classes.  I have wanted to share them but I wasn't sure how to go about it.  So,  I am going to start short blog posts that share these quick and easy tips that will hopefully help you in the kitchen!

Cutting Avocados:

Of course you want to make sure they are ripe (soft).

Cut the avocado in half as seen here.


In this case, the avocado was so ripe that the pit was really easy to take out.  But, an easy tip that I saw on a show once was to hit it with a sharp knife.


When you pull the knife up it should bring the pit with it.


In this case, I needed chunks of avocado.  So, I simply made my cuts while the peel/outer shell was still on.

Then I popped the chunks out!


Much better than the old way I did it which usually ended up with half of it being mush!

Friday, December 16, 2011

Macaroon Kiss Cookies

If you love Almond Joy candy bars you will love these cookies!


Ingredients:

1/3 cup butter
3 ounces cream cheese
3/4 cup sugar
1 egg yolk
5 cups sweetened coconut (divided 3 & 2)
2 teaspoons almond extract
2 teaspoon orange juice
1 1/4 cups flour
2 teaspoons baking powder
1/4 teaspoon salt
Hershy Kisses (with almonds if you prefer), unwrapped

Directions:

Beat butter, cream cheese, and sugar together.  Add egg yolk, almond extract, and orange juice - mix.  Add flour, baking powder, and salt - mix.  Stir in 3 cups of the coconut. 

REFRIGERATE FOR 1 HOUR in a sealed container!

Use a cookie scoop or tablespoon to portion out dough into appropriate cookie size.  Roll each "cookie" into a ball and then roll it into the remaining coconut to cover the dough.  Place on ungreased cookie sheet 2" apart and bake at 350 degrees for 10-12 minutes, until lightly browned.  Take the cookies out of the oven and immediately press a kiss in the middle.  Move cookies to a rack to cool.  Do not stack cookies until the kisses have firmed (over night or put in a freezer for a few minutes to speed up the process).

Store in an air tight container to keep them soft.

Sunday, December 11, 2011

Christmas Mouse Ornament

While shopping one day my daughter and I noticed this on a mall tree.  They were so cute!  Of course I had to take some pictures so we could make some at home!


For starters, I dug through my craft supplies and then did a little shopping.  You will need:

Red and white fuzzy sticks (I purchased the ones pictured at Wal-mart for $.97 a 25 pack).
Small buggy eyes or black sequins
Red and white felt
Small red, white, or black pom-poms
Elmer's Glue

I didn't have a pattern so I made some myself using a variety of oval and tear-drop shapes cut out of paper.  I took a picture of them on this cutting board so you could have an idea of the sizes.

Next I twisted together a white and red fuzzy stick to make a "candy cane".  You could use real candy canes but then they will be perishable.

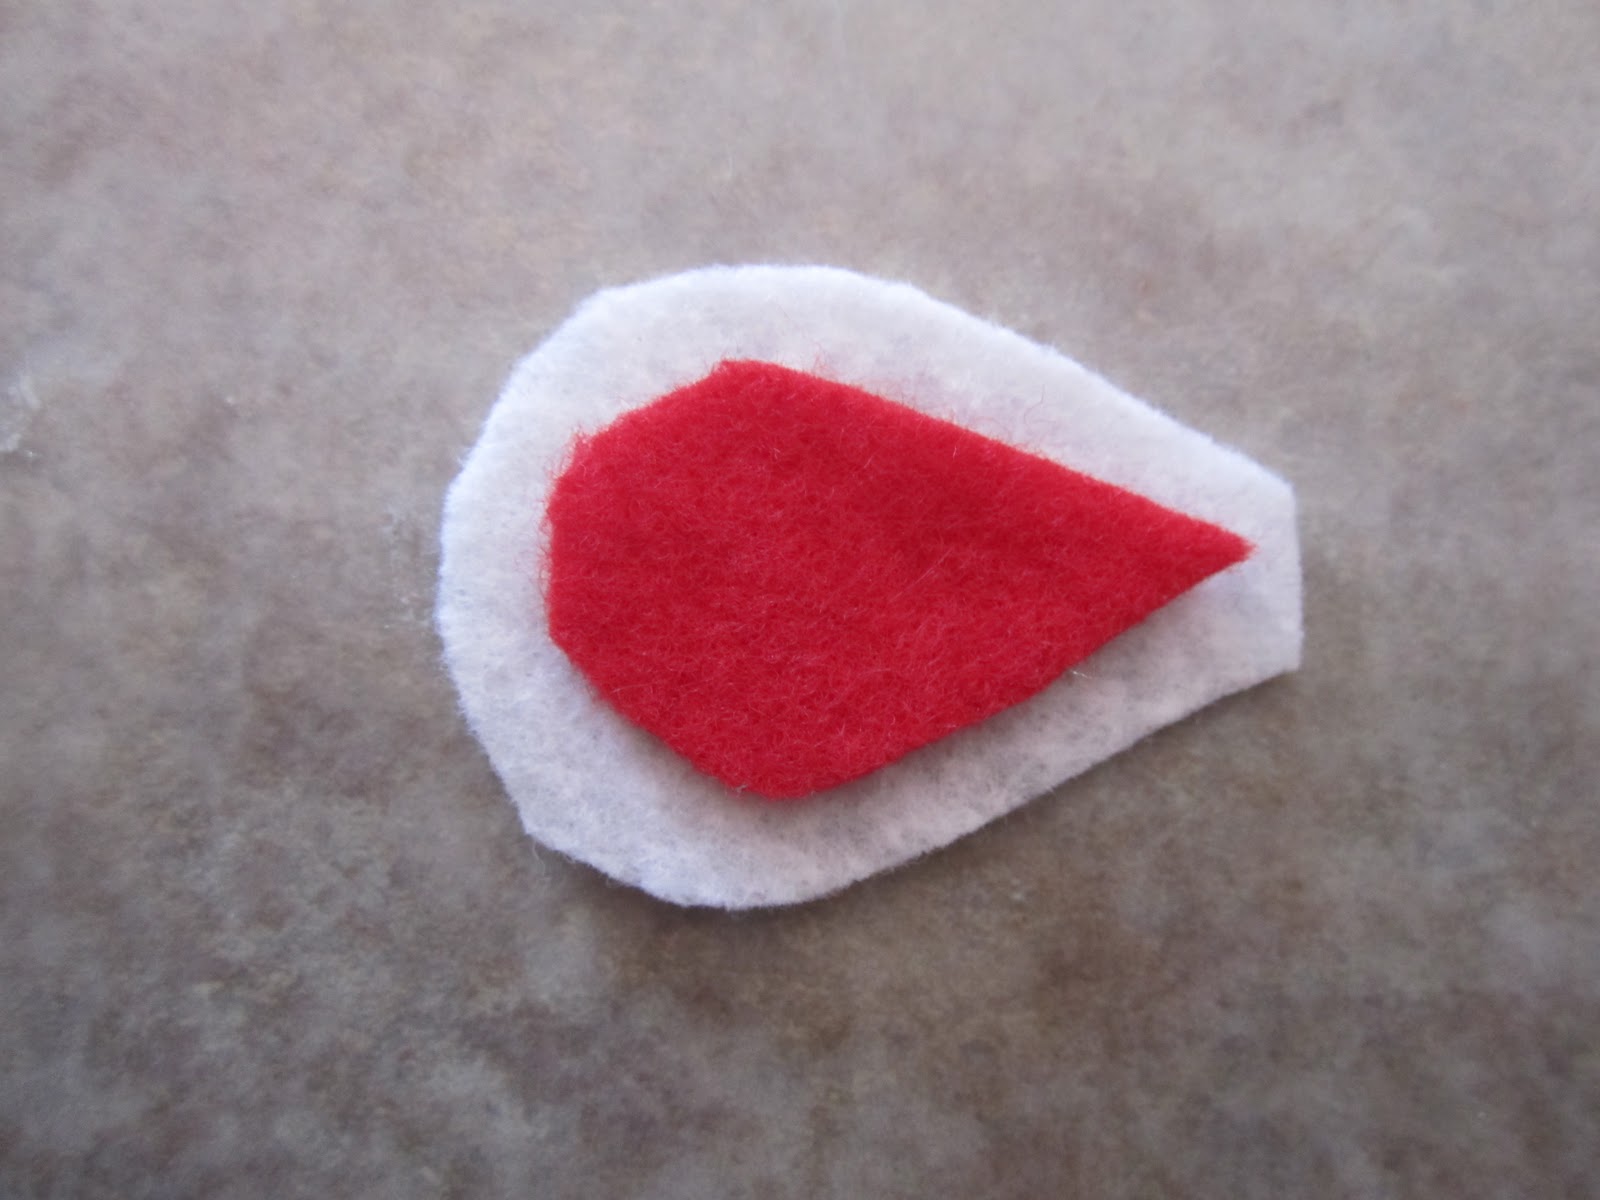
Then I cut the felt to make the mouse bodies and ears.  The white mouse has a white body, white ear, and red inner ear.  The red mouse has a red body, red ear and white inner ear.

Glue the inner ear to the larger ear as seen in the pictures below.


To add the ears to the body of the mouse, cut two vertical lines in the body.  Make sure that you have enough room for the face under the ears.  Slide a small portion of the ears into each slit and glue the back.  See the pictures below.


Next, add a face by gluing on eyes and a nose.  The one we saw at the mall had the sequin eyes but I liked the idea of the buggy eyes.  They both turned out very nice.


For the tail:  Cut two horizontal lines into the mouse body.  From the back side, slide the tail into the top slit and then back out through the 2nd slit.  Bend the tail to form the shape of a candy cane (which will also allow you to hang it on a tree).


Fold up a portion of the tail so it will curl over the middle portion of the slits and secure it to the body. 


Now you have cute little mice for your tree!


We also wrote each child's name on the back with the year.

Update:  later I found a DIY on Martha Stewart with a template!!!  http://www.marthastewart.com/273608/candy-cane-mice